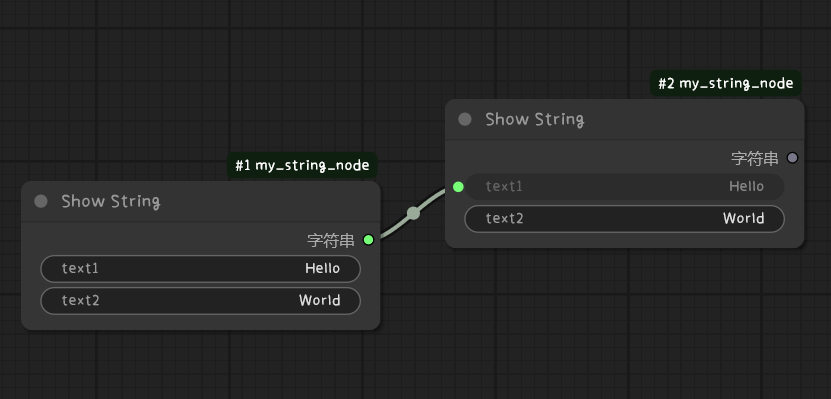
class MyStringNode:
    @classmethod
    def INPUT_TYPES(s):
        return {
            "required": {
                "text1": ("STRING", {"default": "Hello"}),
                "text2": ("STRING", {"default": "World"}),
            }
        }

    RETURN_TYPES = ("STRING",)
    FUNCTION = "show_string"
    CATEGORY = "Examples"
    OUTPUT_NODE = True

    def show_string(self, text1, text2):
        result = text1 + text2
        print(result)
        return (result,)

NODE_CLASS_MAPPINGS = {
    "MyStringNode": MyStringNode
}
NODE_DISPLAY_NAME_MAPPINGS = {
    "MyStringNode": "Show String"
}

2025-09-14T10:43:38.png
2025-09-14T10:44:04.png

在uniapp中使用播放器video这种原生组件,会导致层级问题。解决这个问题的办法就是使用nvue页面。但是这个页面的css样式很多都不支持。其中文字换行就是一个。
第一层
在一个text中,文字是可以换行,但是不能做到给不同的文字不同的样式。

第二层
如果仅仅是考虑文字的颜色问题:直接用rich-text,可以设置不同的颜色。但是无法解决背景颜色问题。而且不能解决宽度自适应的问题。如果给外层套一层view,设置背景颜色就是100%的宽度了。或者固定的宽度。

第三层
用text包裹单个字符,外层给出 flex-flow: row wrap的样式。这种方式可以给每个字符设置背景颜色,以及padding margin等属性。问题就是无法整体设置。但是可以用一些取巧的办法。比如第一个字符可以是任意一个字,颜色设置透明,最后一个字同样操作。中间的字符只要设置padding-top padding-bottom就行。这样就能伪装成一个块了。但是如果用v-for遍历字符,会丢失表情字符

第四层
用Array.from 将字符串转成字符数组。保留了表情字符。

最后的效果:
2025-09-06T04:42:04.png

    import pydirectinput
import time
import random
from typing import Tuple, Optional

class AutoClicker:
    def __init__(self):
        # 初始化自动点击器
        # 设置 pydirectinput 参数
        pydirectinput.FAILSAFE = True  # 启用故障安全(移动鼠标到左上角停止)
        pydirectinput.PAUSE = 0.1  # 操作间隔时间
        
    def click_at_position(self, x: int, y: int, button: str = "left", clicks: int = 1):
        """
        在指定位置点击
        
        Args:
            x: X 坐标
            y: Y 坐标
            button: 鼠标按钮 ("left", "right", "middle")
            clicks: 点击次数
        """
        try:
            pydirectinput.click(x, y, button=button, clicks=clicks)
            print(f"在位置 ({x}, {y}) 点击了 {clicks} 次 {button} 键")
        except Exception as e:
            print(f"点击失败: {e}")
    
    def move_to_position(self, x: int, y: int):
        """
        移动鼠标到指定位置
        
        Args:
            x: X 坐标
            y: Y 坐标
        """
        try:
            pydirectinput.moveTo(x, y)
            print(f"鼠标移动到位置 ({x}, {y})")
        except Exception as e:
            print(f"移动鼠标失败: {e}")
    
    def drag_and_drop(self, start_x: int, start_y: int, end_x: int, end_y: int):
        """
        拖拽操作
        
        Args:
            start_x: 起始 X 坐标
            start_y: 起始 Y 坐标
            end_x: 结束 X 坐标
            end_y: 结束 Y 坐标
        """
        try:
            pydirectinput.moveTo(start_x, start_y)
            pydirectinput.mouseDown(button="left")
            time.sleep(0.1)
            pydirectinput.moveTo(end_x, end_y)
            time.sleep(0.1)
            pydirectinput.mouseUp(button="left")
            print(f"从 ({start_x}, {start_y}) 拖拽到 ({end_x}, {end_y})")
        except Exception as e:
            print(f"拖拽失败: {e}")
    
    def double_click(self, x: int, y: int):
        """
        在指定位置双击
        
        Args:
            x: X 坐标
            y: Y 坐标
        """
        self.click_at_position(x, y, clicks=2)
    
    def right_click(self, x: int, y: int):
        """
        在指定位置右键点击
        
        Args:
            x: X 坐标
            y: Y 坐标
        """
        self.click_at_position(x, y, button="right")
    
    def scroll(self, x: int, y: int, direction: str = "down", clicks: int = 3):
        """
        在指定位置滚动
        
        Args:
            x: X 坐标
            y: Y 坐标
            direction: 滚动方向 ("up" 或 "down")
            clicks: 滚动次数
        """
        try:
            pydirectinput.moveTo(x, y)
            if direction == "down":
                pydirectinput.scroll(-clicks)  # 向下滚动
            else:
                pydirectinput.scroll(clicks)   # 向上滚动
            print(f"在位置 ({x}, {y}) {direction} 滚动了 {clicks} 次")
        except Exception as e:
            print(f"滚动失败: {e}")
    
    def get_mouse_position(self) -> Tuple[int, int]:
        """
        获取当前鼠标位置
        
        Returns:
            鼠标坐标 (x, y)
        """
        try:
            x, y = pydirectinput.position()
            return (x, y)
        except Exception as e:
            print(f"获取鼠标位置失败: {e}")
            return (0, 0)
    
    def click_sequence(self, positions: list, delay: float = 1.0):
        """
        按顺序点击多个位置
        
        Args:
            positions: 位置列表,每个元素为 (x, y) 或 (x, y, button, clicks)
            delay: 每次点击之间的延迟时间
        """
        print(f"开始执行点击序列,共 {len(positions)} 个位置")
        for i, pos in enumerate(positions):
            if len(pos) == 2:
                x, y = pos
                self.click_at_position(x, y)
            elif len(pos) == 4:
                x, y, button, clicks = pos
                self.click_at_position(x, y, button, clicks)
            
            if i < len(positions) - 1:  # 不是最后一个位置
                time.sleep(delay)
                print(f"等待 {delay} 秒...")
        
        print("点击序列执行完成")

def demo_usage():
    """演示使用方法"""
    print("=== PyDirectInput 自动点击程序演示 ===")
    print("注意:移动鼠标到屏幕左上角可以停止程序")
    
    # 创建自动点击器实例
    clicker = AutoClicker()
    
    # 等待用户准备
    print("\n程序将在 3 秒后开始演示...")
    time.sleep(3)
    
    # 获取当前鼠标位置
    current_pos = clicker.get_mouse_position()
    print(f"当前鼠标位置: {current_pos}")
    
    # 演示各种操作
    print("\n1. 移动鼠标到屏幕中央")
    clicker.move_to_position(960, 540)  # 假设 1920x1080 屏幕
    
    print("\n2. 左键点击")
    clicker.click_at_position(960, 540)
    
    print("\n3. 右键点击")
    clicker.right_click(1000, 540)
    
    print("\n4. 双击")
    clicker.double_click(1040, 540)
    
    print("\n5. 拖拽操作")
    clicker.drag_and_drop(800, 400, 1100, 600)
    
    print("\n6. 滚动操作")
    clicker.scroll(960, 540, "down", 5)
    
    print("\n7. 执行点击序列")
    positions = [
        (800, 400),
        (900, 400),
        (1000, 400),
        (1100, 400),
        (1200, 400)
    ]
    clicker.click_sequence(positions, delay=0.5)
    
    print("\n演示完成!")

def custom_clicking():
    """自定义点击功能"""
    clicker = AutoClicker()
    
    print("\n=== 自定义点击模式 ===")
    print("输入坐标进行点击,输入 'q' 退出")
    
    while True:
        try:
            user_input = input("\n请输入坐标 (格式: x,y 或 x,y,button,clicks): ").strip()
            
            if user_input.lower() == 'q':
                print("退出程序")
                break
            
            # 解析输入
            parts = user_input.split(',')
            if len(parts) == 2:
                x, y = map(int, parts)
                clicker.click_at_position(x, y)
            elif len(parts) == 4:
                x, y, button, clicks = int(parts[0]), int(parts[1]), parts[2], int(parts[3])
                clicker.click_at_position(x, y, button, clicks)
            else:
                print("格式错误!请使用 x,y 或 x,y,button,clicks 格式")
                
        except ValueError:
            print("输入格式错误!请输入有效的数字")
        except KeyboardInterrupt:
            print("\n程序被中断")
            break

if __name__ == "__main__":
    try:
        # 运行演示
        demo_usage()
        
        # 询问是否继续自定义点击
        choice = input("\n是否继续自定义点击?(y/n): ").strip().lower()
        if choice == 'y':
            custom_clicking()
            
    except Exception as e:
        print(f"程序运行出错: {e}")
        print("请确保已安装 pydirectinput: pip install pydirectinput")
数据加载

# =============================================================================
# MNIST手写数字识别神经网络项目
# 这是一个使用PyTorch构建的简单神经网络,用于识别手写数字0-9
# =============================================================================

# 导入必要的库
import torch  # PyTorch深度学习框架
from pathlib import Path  # 用于处理文件路径
import requests  # 用于下载数据(虽然这里被注释了)
import numpy as np  # 数值计算库
from matplotlib import pyplot  # 绘图库,用于显示图片
import pickle  # 用于序列化和反序列化Python对象
import gzip  # 用于处理压缩文件
import pylab  # matplotlib的简化接口
import torch.nn.functional as F  # PyTorch的函数式接口
from torch import nn  # PyTorch的神经网络模块
from torch.utils.data import TensorDataset  # 用于创建数据集
from torch.utils.data import DataLoader  # 用于批量加载数据
from torch import optim  # PyTorch的优化器

# 定义损失函数:交叉熵损失,常用于多分类问题
loss_fun = F.cross_entropy

# =============================================================================
# 数据准备部分
# =============================================================================

# 设置数据存储路径
DATA_PATH = Path("data")  # 数据文件夹
PATH = DATA_PATH / "mnist"  # MNIST数据的具体路径

# 创建数据目录(如果不存在的话)
PATH.mkdir(parents=True, exist_ok=True)

# 原本用于下载数据的URL(已被注释)
# URL = "http://deeplearning.net/data/minst/"

# MNIST数据文件名
FILENAME = "mnist.pkl.gz"

# 原本用于下载数据的代码(已被注释)
# if not(PATH/FILENAME).exists():
#     content = requests.get(URL + FILENAME).content
#     (PATH /FILENAME).open("wb").write(content)

# 从压缩文件中加载MNIST数据集
# MNIST数据集包含训练集、验证集和测试集
with gzip.open((PATH/FILENAME).as_posix(), "rb") as f:
    ((x_train, y_train), (x_valid, y_valid), _) = pickle.load(f, encoding="latin-1")
# print(x_train.shape)  # 打印训练数据的形状

# 将numpy数组转换为PyTorch张量(tensor)
# 这是PyTorch处理数据的基本格式
x_train, y_train, x_valid, y_valid = map(torch.tensor, (x_train, y_train, x_valid, y_valid))

# print(x_train.shape, y_train.shape, x_valid.shape, y_valid.shape)  # 打印所有数据的形状

# 以下是一些测试代码(已被注释)
# a = torch.randn([2,2])  # 创建随机2x2张量
# b = torch.randn([2,2])  # 创建随机2x2张量
# print(loss_fun(a,b))  # 测试损失函数

# 测试图片显示的代码(已被注释)
# img = torch.tensor([0,0,0,1,0,0,0,0,0])  # 创建简单的3x3图片
# pyplot.imshow(img.reshape(3,3), cmap="gray")  # 显示图片
# pyplot.show()

# 显示MNIST训练图片的代码(已被注释)
# pyplot.imshow(x_train[2].reshape(28,28), cmap="gray")  # 显示第3张训练图片
# pyplot.show()

# 以下是一些手动实现神经网络的代码(已被注释)
# bs = 64  # 批次大小
# xb = x_train[0:bs]  # 取前64个训练样本
# yb = y_train[0:bs]  # 对应的标签
# weights = torch.randn([784,10], dtype=torch.float, requires_grad=True)  # 权重矩阵
# bias = torch.zeros(10, requires_grad=True)  # 偏置向量
# loss_func = F.cross_entropy  # 损失函数
# =============================================================================
# 神经网络模型定义
# =============================================================================

class Minst_NN(nn.Module):
    """
    MNIST手写数字识别的神经网络模型
    网络结构:输入层(784) -> 隐藏层1(128) -> 隐藏层2(256) -> 输出层(10)
    784 = 28*28,因为MNIST图片是28x28像素
    10 = 数字0-9的10个类别
    """

    def __init__(self):
        super().__init__()  # 调用父类构造函数,这是必须的
        # 第一个全连接层:784个输入特征 -> 128个隐藏单元
        self.hidden1 = nn.Linear(784, 128)
        # 第二个全连接层:128个输入特征 -> 256个隐藏单元
        self.hidden2 = nn.Linear(128, 256)
        # 输出层:256个输入特征 -> 10个输出(对应0-9数字)
        self.out = nn.Linear(256, 10)
        # Dropout层:随机丢弃50%的神经元,防止过拟合
        self.dropout = nn.Dropout(0.5)

    def forward(self, x):
        """
        前向传播函数
        定义数据如何通过网络层
        """
        # 第一层:线性变换 + ReLU激活函数
        x = F.relu(self.hidden1(x))
        # 应用Dropout防止过拟合
        x = self.dropout(x)
        # 第二层:线性变换 + ReLU激活函数
        x = F.relu(self.hidden2(x))
        # 再次应用Dropout
        x = self.dropout(x)
        # 输出层:线性变换(不需要激活函数,因为使用交叉熵损失)
        x = self.out(x)
        return x

# =============================================================================
# 数据准备和训练设置
# =============================================================================

# 设置批次大小(每次训练使用的样本数量)
bs = 64

# 创建训练和验证数据集
# TensorDataset将输入数据和标签打包成数据集
train_ds = TensorDataset(x_train, y_train)  # 训练数据集
valid_ds = TensorDataset(x_valid, y_valid)  # 验证数据集

def get_data(train_ds, valid_ds, bs):
    """
    创建数据加载器
    数据加载器用于批量加载数据,提高训练效率
    """
    return (
        DataLoader(train_ds, batch_size=bs, shuffle=True),  # 训练数据加载器,打乱数据
        DataLoader(valid_ds, batch_size=bs*2),  # 验证数据加载器,批次大小是训练时的2倍
    )

def loss_batch(model, loss_fun, xb, yb, opt=None):
    """
    计算一个批次的损失并更新模型参数
    
    参数:
    - model: 神经网络模型
    - loss_fun: 损失函数
    - xb: 输入数据批次
    - yb: 标签批次
    - opt: 优化器(可选,如果提供则更新参数)
    
    返回:
    - loss.item(): 损失值
    - len(xb): 批次大小
    """
    # 计算损失:模型预测结果与真实标签的差异
    loss = loss_fun(model(xb), yb)

    # 如果提供了优化器,则进行反向传播和参数更新
    if opt is not None:
        loss.backward()  # 反向传播,计算梯度
        opt.step()      # 更新模型参数
        opt.zero_grad() # 清零梯度,为下次计算做准备

    return loss.item(), len(xb)  # 返回损失值和批次大小

def fit(steps, model, loss_func, opt, train_dl, valid_dl):
    """
    训练模型的主函数
    
    参数:
    - steps: 训练轮数
    - model: 神经网络模型
    - loss_func: 损失函数
    - opt: 优化器
    - train_dl: 训练数据加载器
    - valid_dl: 验证数据加载器
    """
    for step in range(steps):
        # 设置模型为训练模式(启用Dropout等)
        model.train()
        # 遍历训练数据的所有批次
        for xb, yb in train_dl:
            loss_batch(model, loss_func, xb, yb, opt)

        # 设置模型为评估模式(禁用Dropout等)
        model.eval()
        # 在验证集上评估模型(不计算梯度)
        with torch.no_grad():
            losses, nums = zip(
                *[loss_batch(model, loss_func, xb, yb) for xb, yb in valid_dl]
            )
        # 计算验证集上的平均损失
        val_loss = np.sum(np.multiply(losses, nums)) / np.sum(nums)
        print("当前step:" + str(step), '验证集损失:' + str(val_loss))

def get_model():
    """
    创建模型和优化器
    
    返回:
    - model: 神经网络模型
    - opt: Adam优化器
    """
    model = Minst_NN()  # 创建模型实例
    return model, optim.Adam(model.parameters(), lr=0.001)  # 返回模型和Adam优化器


# =============================================================================
# 模型训练和评估
# =============================================================================

# 创建数据加载器
train_dl, valid_dl = get_data(train_ds, valid_ds, bs)

# 创建模型和优化器
model, opt = get_model()

# 开始训练模型(训练10个epoch)
print("开始训练模型...")
fit(10, model, loss_fun, opt, train_dl, valid_dl)

# =============================================================================
# 模型验证和准确率计算
# =============================================================================

print("\n开始验证模型准确率...")

# 初始化准确率计算变量
correct = 0  # 预测正确的样本数
total = 0    # 总样本数

# 设置模型为评估模式
model.eval()

# 在验证集上测试模型
with torch.no_grad():  # 不计算梯度,节省内存和计算时间
    for xb, yb in valid_dl:
        # 获取模型预测结果
        outputs = model(xb)
        # 找到预测概率最高的类别(torch.max返回值和索引,我们只要索引)
        _, predicted = torch.max(outputs.data, 1)
        
        # 统计总样本数
        total += yb.size(0)
        # 统计预测正确的样本数
        correct += (predicted == yb).sum().item()

# 计算并打印准确率
accuracy = 100 * correct / total
print("模型在验证集上的准确率: {:.2f}%".format(accuracy))
print("正确预测: {}/{}".format(correct, total))

第一步
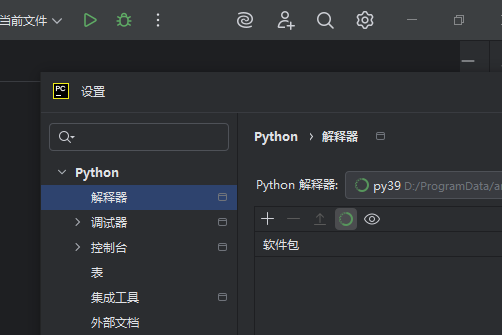
根据自己的安装地址,将conda环境加入到环境变量:
D:\ProgramData\anaconda3
D:\ProgramData\anaconda3\Scripts
D:\ProgramData\anaconda3\Library\bin
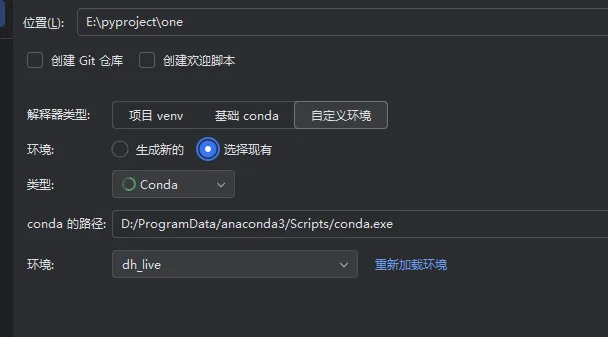
第二步
pycharm中设置conda地址
a5ee1cf7-b6f1-4e57-a12e-109913c1c21d.png
f05e871e-b405-4802-af20-79a2759262d6.png